Step by Step Process to Install IIS in Windows Server
Table of Contents
What is IIS and How Does It Work?
IIS is a web server that is created by Microsoft and has a simple integration process with other Microsoft products. It is a collection of web-based services that utilize the same GUI. An administrator can control website content, security settings, and service configurations through the IIS management console. In addition to the administration console, IIS offers a collection of graphical tools for doing routine activities including building and modifying websites, managing user accounts, and establishing security settings. As one of the web server types, it supports HTTP, HTTPS, FTP, FTPS, SMTP, and NNTP.
Install IIS in Windows Server allows web developers to transmit information to users in a variety of ways, including through file exchanges like downloads and uploads, static HTML-coded webpages, text documents, image files, and more.
Benefits of Install IIS in Windows
Installing Internet Information Services (IIS) on a Windows server offers several benefits, especially for organizations or individuals looking to host websites, web applications, or services. Here are some of the key benefits:
- Web Server Functionality: Installing IIS turns your Windows server into a powerful web server capable of hosting websites and serving web content to clients over the internet or intranet.
- Support for Multiple Websites: IIS allows you to host multiple websites on a single server, each with its own unique domain or IP address. This is useful for organizations that need to host multiple web properties or provide hosting services to clients.
- Scalability: IIS is designed to scale with your needs, allowing you to handle a large number of concurrent connections and efficiently serve web content to users even under heavy loads.
- Integration with Windows Environment: As a Microsoft product, IIS integrates seamlessly with other Windows Server components and services, such as Active Directory for authentication and authorization, Windows Update for security patches, and PowerShell for automation and scripting.
- Support for ASP.NET and Other Technologies: IIS supports a wide range of web development technologies, including ASP.NET, PHP, Perl, and CGI scripts. This allows you to host a variety of web applications and services on your server.
- Security Features: IIS includes built-in security features to help protect your web server and applications from common threats, such as denial-of-service (DoS) attacks, SQL injection, and cross-site scripting (XSS). It also supports SSL/TLS encryption for securing communication between clients and the server.
- Management Tools: IIS comes with a suite of management tools, including IIS Manager, which provides a graphical user interface (GUI) for managing websites, application pools, virtual directories, security settings, and more. Additionally, you can use PowerShell cmdlets to automate administrative tasks and configuration management.
- Performance Monitoring and Logging: IIS includes built-in performance monitoring and logging capabilities, allowing you to track server performance, analyze traffic patterns, and troubleshoot issues. You can monitor metrics such as CPU usage, memory usage, request throughput, and response times to ensure optimal performance.
Steps to Configure IIS in Windows:
After a successful installation, you can start configuring IIS in Windows. Setting up and configuring IIS on Windows is simple, and you can customize it according to your priorities and particular needs.
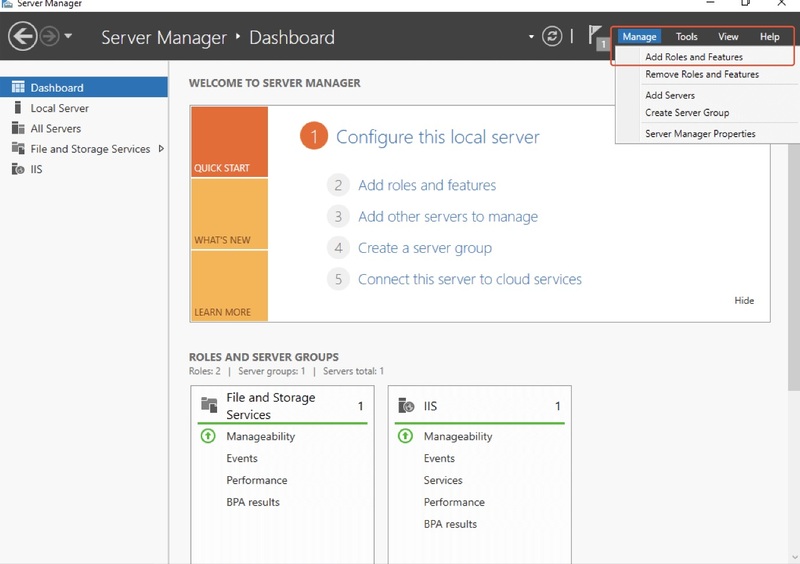
- First, you should begin with setting up the IIS role. To do this, open the ‘’Add Roles and Features’’ and in Server Manager, go to Manage ⇉ Add Roles and Features. Click the Next button when you are finished.
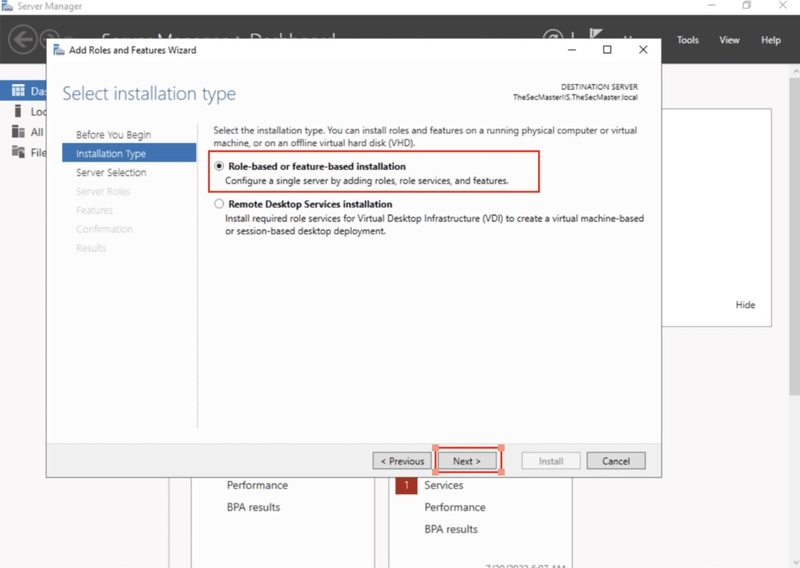
- In the Select Installation Type screen, select Role-based or Feature-based installation since it is role-based. Click Next and go on.
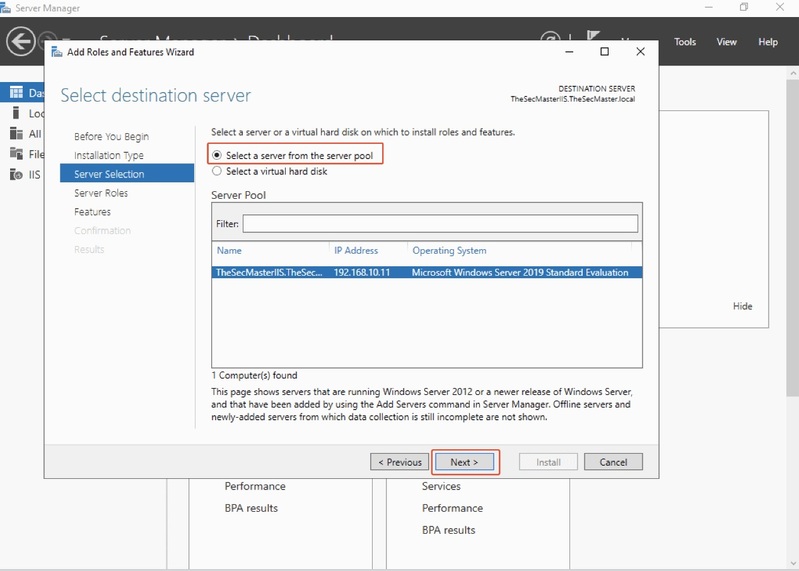
- The server on which you intend to deploy the Web Server (IIS) Role is known as the destination server. Since we will be installing IIS on the local server in this guide, choose that server on the Select the Destination Server screen and then click Next.
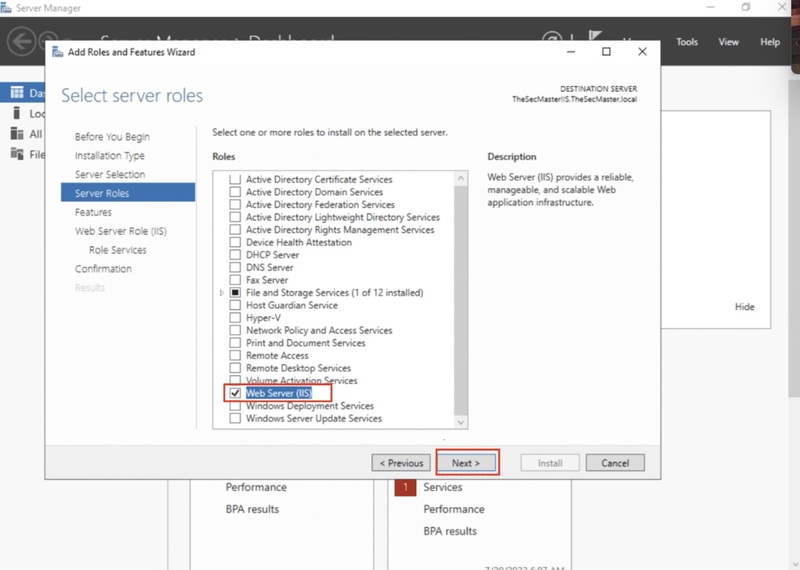
- On the Select Server roles, click on the ‘’Web Server (IIS)’’ role and then click on Next.
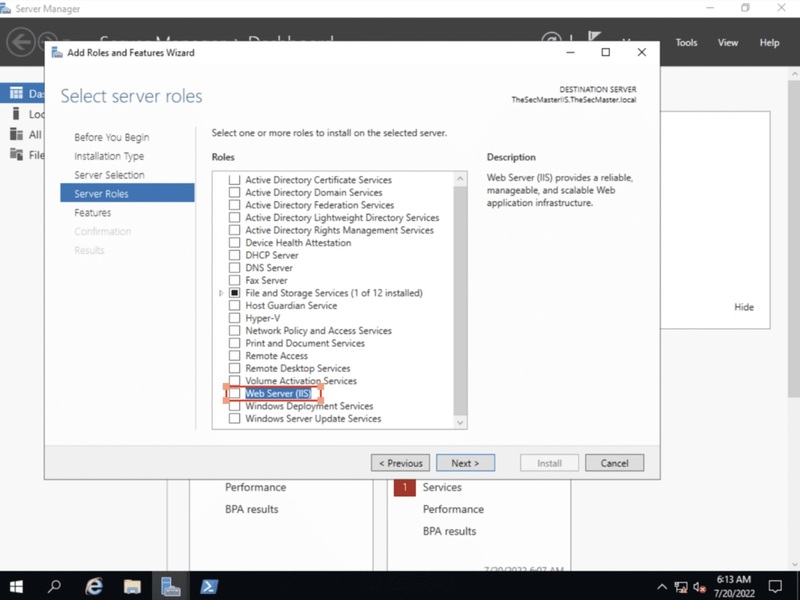
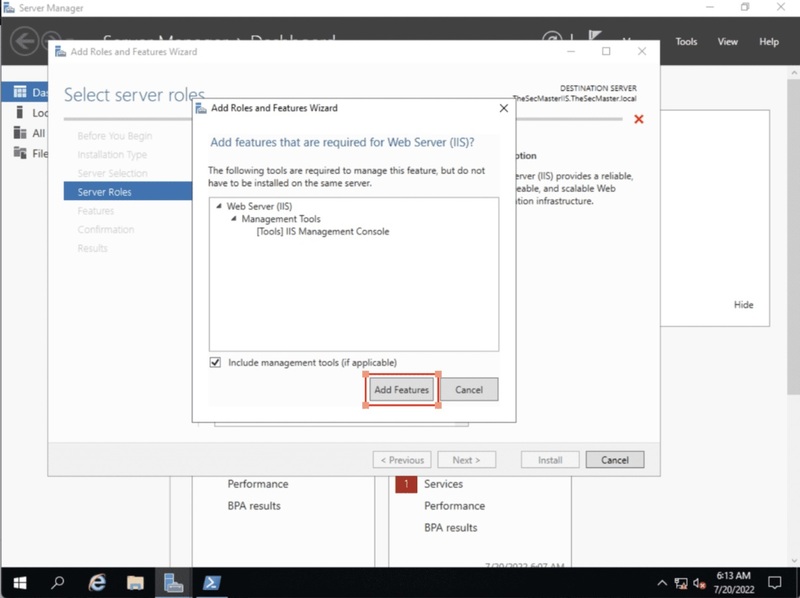
- Then, to add the IIS features, click on the ‘’ Add Features’’ button.
- On the Select Server roles, click on the Server Roles to select the roles to install IIS on the selected server. Click Next and continue.
- In this step, to install IIS on the selected server, Select features.
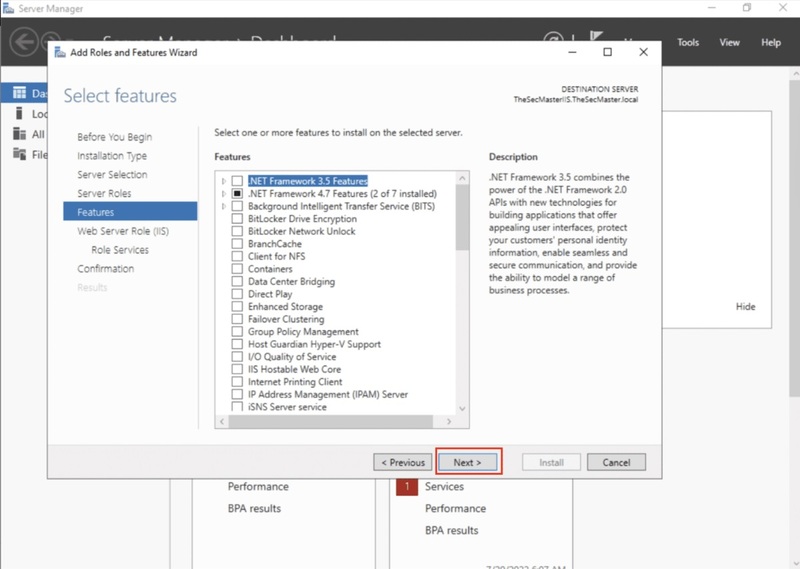
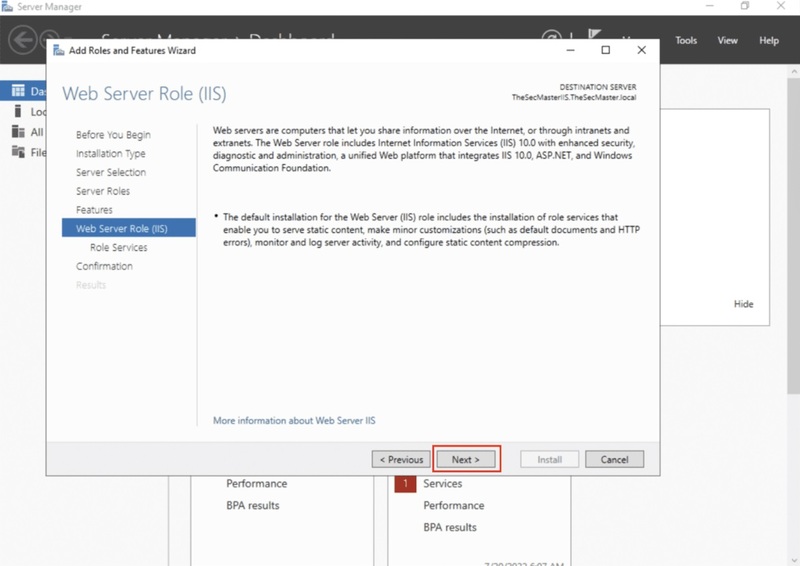
- To install the default Role service, select Web Server Roles (IIS) and click Next.
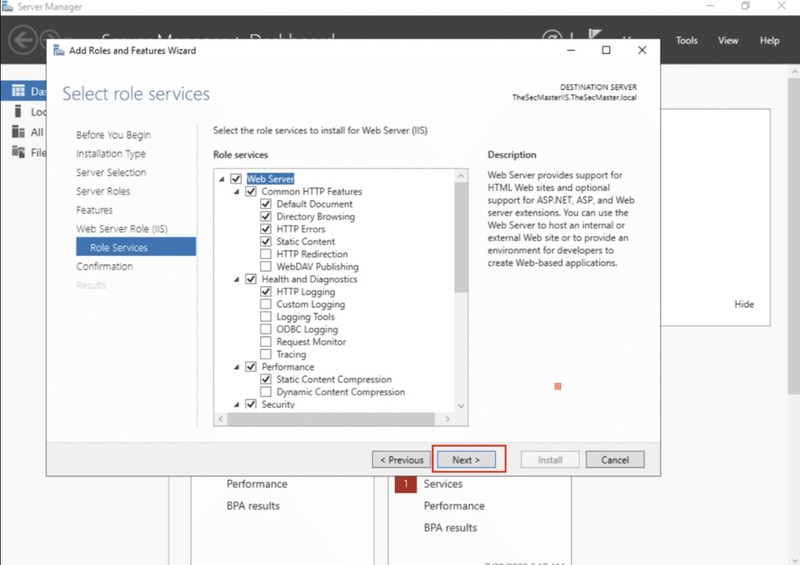
- To install the IIS Web Server, select the role service. The ‘’Role Services’’ is the default selection. Let it be chosen since the ‘’Role Services’’ are good for configuring the Basic IIS site. When you are finished, click Next.
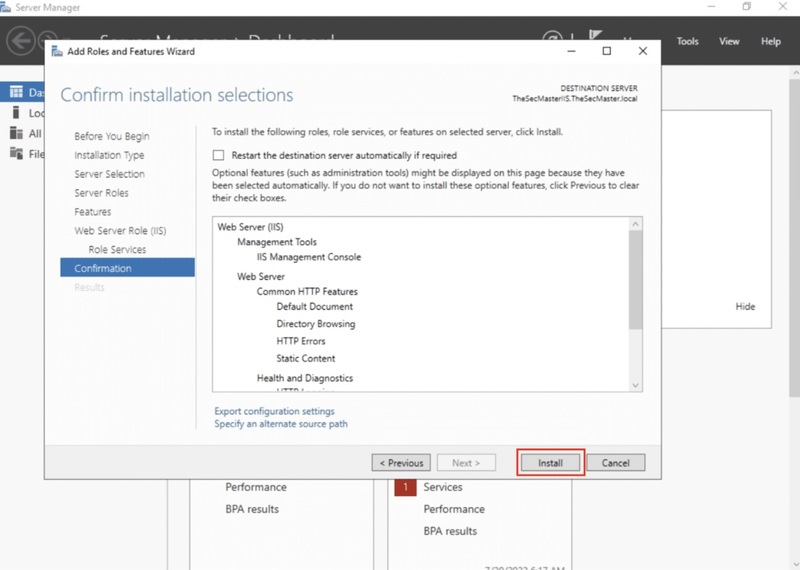
- On the Confirm installation selection, the installation configuration of the ‘’Web server (IIS)’’ role must be confirmed. To do this, confirm the settings and click on the Install button to begin the installation of ‘’Web server (IIS)’’ role.
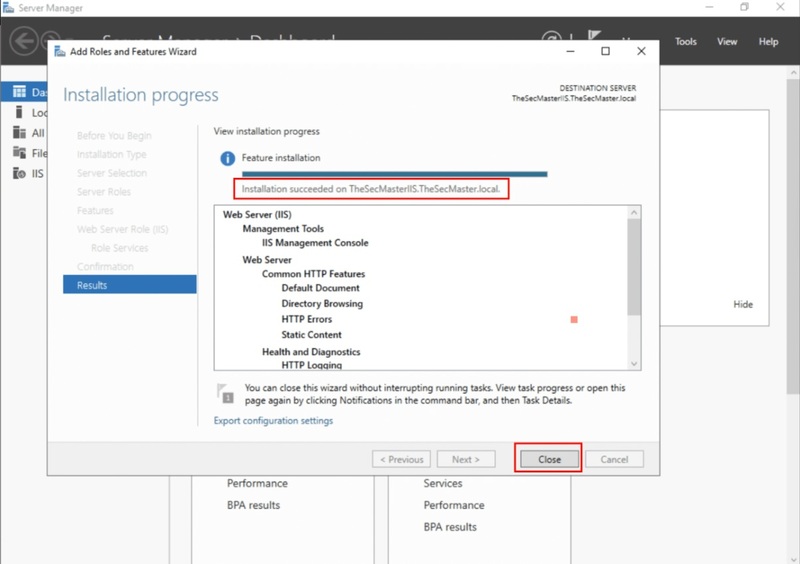
- On the Installation progress, once the configuration wizard is completed click on the Close button.
- It is time to verify the IIS web server is running. To do this, visit the default page of your IIS server to check it out. Open a browser on the server, input the server hostname or IP address in the address box, and press enter to view the default web page.
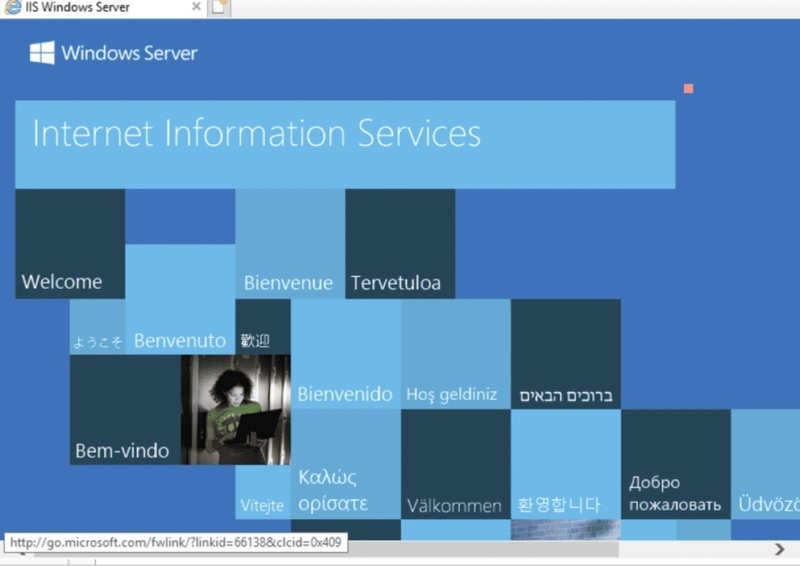
That’s it! You have now installed and configured IIS on Windows Server.
Conclusion
In this article, you reviewed all the required steps to Install IIS in Windows Server. Now, you know what IIS is and why you need to install and configure it on your Windows. Since IIS is in prominence, it is frequently the target of assaults. So, you must ensure that your IIS installation is secure and up to date. Windows Server 2020, Windows Server 2019, Windows Server 2016, Windows Server 2012, Windows Server 2008, and Windows Server 2003 all support IIS.
